Do you know what a coolant is? A coolant removes the waste heat from the combustion engine. Without the coolant, an engine may degrade or even fail. In case you find that the coolant has overheated, you may want to change engine coolant. With the help of antifreeze, this multifunctional wonder helps warm up engines quickly during cold starts, controls engine temperature, and even fights rust.
A healthy and long-lasting engine coolant depends on routinely monitoring and replacing the coolant, which may save costly repairs and breakdowns. This is especially important if you discover leaks, frequent overheating, or are approaching the required service intervals. In this blog, we will understand how to change the vehicle coolant in your car.
How to Check Your Coolant Levels
Checking your coolant levels is a straightforward process that can help ensure your vehicle’s engine runs smoothly and prevent overheating. Here are the steps to check your coolant levels:
Get the automobile ready
Ensure the engine is cold to the touch and regularly do the car radiator service. Contact a car mechanic if need arises. Since the coolant is toxic, children and dogs should not be near the work area. Prepare a basin or bucket behind the drain stopper to collect any spillage.
Take the coolant out
Take off the drain plug and radiator cap. Your radiator’s drain plug will be at the bottom, and the radiator cap will be on top. See your owner’s handbook or perform a visual inspection if you need clarification on the location of the drain stopper.
The drain plug will be a screw, bolt, or petcock that you may manually open, depending on the kind of car. Let the coolant run until it stops after opening the drain. Close the drain by putting the plug back in, and then dispose of the garbage in an eco-friendly manner.
Empty the radiator flush solution
The car radiator repair sorts out all of the issues. When the engine has cooled, replace your pan or bucket below the car radiator. Then, unscrew the drain plug to allow the solution to run out. When it’s finished, replace and tighten the drain plug.
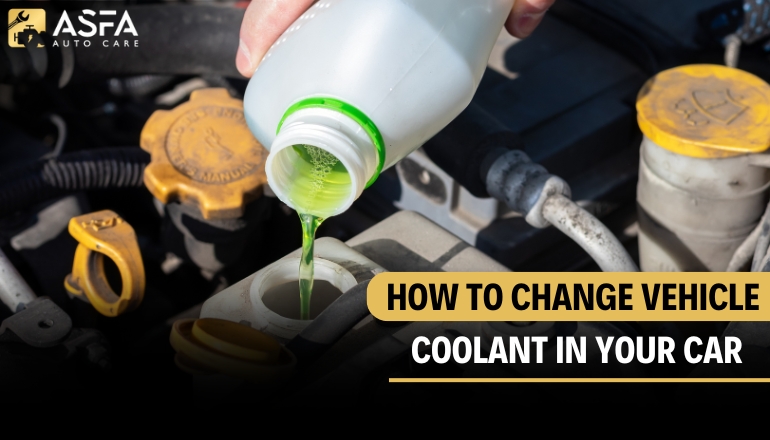
Pour in the radiator flush solution
Once the radiator cap is open, pour your radiator flush solution and top it with water. Replace and tighten the radiator cap after starting the vehicle and allowing the engine to run for up to ten minutes.
Before you do, make sure the gear is neutral and that a qualified professional is doing it in an auto care shop. After that, let it cool down and switch off the engine. If the engine is still hot, never open the radiator cap because the hot water within the radiator might burn you.
Start the engine and let the new coolant circulate
To ensure that the engine coolant and water are distributed equally throughout the system, tighten the radiator cap and run the engine for up to ten minutes. Once the engine is off, you’re done. Ensure you take the old coolant to a technician, gas station, or auto parts store for safe disposal. Now, you need to change your car’s coolant.
Why is it Necessary to Replace the Engine Coolant?
Unsurprisingly, your car’s coolant fluid loses its efficiency over time as the antifreeze ingredients weaken, especially if you often fill them with water. Additionally, this may cause the coolant to freeze and expand during severe winter conditions, harming the engine’s internal parts.
Because of this, it’s important to periodically drain, cleanse, and refill the cooling system to replenish the antifreeze mixture and stop rust and corrosion from developing.
Tools Needed for this Coolant Add Project
Prepare the equipment you’ll need in advance to save time and energy when doing this do-it-yourself job.
4-in-1 multipurpose screwdriver
Adaptable wrench
Compressor air
Air hose rags
safety glasses
pliers for slip joints
Ratchet and socket set
A problem light, jack stands, a bucket, a funnel, a drain pan, disposable gloves, and hose clamp pliers are also required. For newer vehicles, you’ll need an air-powered refill tool.
A Comprehensive Guide to Engine Coolant Replacement
Always consult your car’s handbook for specific instructions and part locations. Prioritize safety at all times! To avoid burns, ensure the engine is completely cool before beginning the coolant replacement process.
Step1: Park and Lock Up Your Vehicle
Park on a flat surface.
Press the parking brake and move the gearbox first (or park for automated transmissions).
Step 2: Remove the previous coolant
Using a jack, raise the front of your vehicle.
Secure the back wheels with chocks and place jack stands beneath the appropriate spots.
Any underbody shielding that might obstruct the drain valve should be removed.
Find the drain valve (see your handbook if necessary).
To collect the used coolant, place a container underneath the radiator.
Allow the old coolant to drain out by opening the drain valve.
Step 3: (Optional) Clear the System
Although optional, taking this step is advised if your coolant appears filthy or you suspect buildup.
To drain away any residual coolant, repeat Step 2’s steps 8 and 9 a few times.
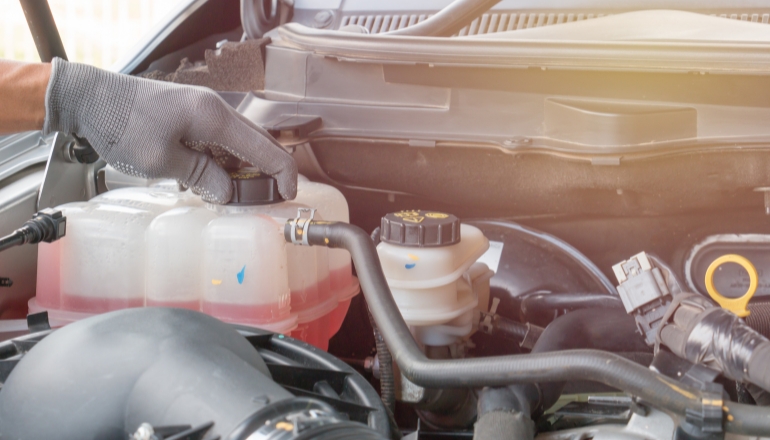
Step 4: Fill in and, if necessary, bleed
Find the coolant reservoir and remove it. After emptying any leftover coolant, replace it.
Securely close the drain valve (see your handbook for tightening instructions).
Replace the coolant in the system. Use the kind that your automobile manufacturer recommends, which is often a pre-mixed coolant solution. Fill the radiator up to the filler neck’s base.
To get rid of air pockets, the system may need to be bled (see your handbook). This might entail turning on the heater while operating the engine and adding the coolant when the air leaves.
Put the radiator speciality cap back on.
Step 5: Concluding Details
For a little period, run the engine. Keep an eye out for leaks and adequate coolant circulation.
Verify the coolant level once again. After the cooling fan goes on, top up if needed.
It’s imperative to keep your engine cold; coolant is the superhero that makes this happen. It controls temperature, rapidly preheats, and even stops rust. Regularly checking and replacing your coolant is simple and can save you expensive breakdowns.
This post shows you step-by-step instructions on changing your car coolant in your automobile. Don’t forget to refer to your car’s handbook for information on exact locations and safety measures. Your engine may be kept in good working order for many years with a little do-it-yourself attitude. If you’re not able to do it yourself, contact a car mechanic specialist.